Showing posts with label kids crafts. Show all posts

Thursday, February 12, 2009

Even More Valentines

Have you ever been over to The Crafty Crow? It's an awesome website filled with great craft ideas for the kiddos. I stop by there at least four times a week. Its wonderful when Cate (the little girl I babysit) wants to try something new and we need inspiration. They are all about Valentines right now at The Crafty Crow. I saw this easy craft and thought it wold be perfect to fill that last half hour before Cate's dad came to pick her up. Ethan was home from school with strep throat (but had been dosed with antibiotics several times before Cate arrived, so don't worry!) so he joined the fun.

Both kids really loved painting with watercolors. I forget that just switching up the supplies can be so exciting for these little people.


They drew what was in their hearts first, then painted them. Cate painted a "crazy man" and her cat Pumpkin. Ethan first made the veins and arteries coming out of the heart (future medical illustrator perhaps?) then drew in his family, including my grandmother and great aunt who both recently passed away and the Ford Escape that Justin rented once for a business trip (??) I know, sort of random. But I love them!

If you have a 9 year old boy you may understand how awkward Valentine's Day can be. Hudson hates the store bought Valentines so we always have to come up with something that is not too mushy or lovey or "girlie" but still captures the essence of Valentine's Day. This year he drew a spaceship and I transferred it into a stamp, the same way I did the stamps for letterboxing earlier this year. Then I printed a simple message on the computer and he stamped away. We added the little heart stamp so it would be more "Valentiney". We folded each card, sealed the bottom and side with tape and he had a little pouch to place his goodies in for his schoolmates. (You can see it at the very top of the picture below.)

The nice thing is that he now had a cool spaceship stamp to use when we go letterboxong, or for whenever!

Thursday, December 4, 2008

Christmas Present makin'- Christmas Past version

Because I don't have anything new to show you yet, and because I did not have this blog last year at Christmas present makin' time, I am going to share what I made for gifts last year.

This is the little train bag and quilt set I made for Jack. (My little charge Cate was my toy tester.) Before he was a tractor freak he was a train freak. I bought the fabric with the train on it at the awesome fabric store that closed, and added the rest from my stash. The quilt flips over to a play mat. I got the train at Target in the dollar bin, and the tote was from Micheal's or Joann's.

Here's a close-up of his name on the bag. When Ethan saw the bag he wanted something special too... so I made him a "5" pillow. It's in the picture below behind Knuffle bunny... which I made for him for Christmas.

Here's Knuffle on Christmas morning.Knuffle Bunny is one of Ethan's favorite books. I searched high and low for a knuffle softie, but didn't like what I found... so I decided to try to make him one. He's made from a green sweater I found at the local thrift shop, some felt and a big white pom pom tail. I didn't use a pattern (do I ever? I'm far too lazy) so he's a little wonky... but Ethan loves him.
I also made for some fabric flower barrettes for Alex, a squid t-shirt for Hudson, a set of coasters for my friend Sue, artsy clutches (from Bend the Rules Sewing) for all my sisters and my mom, some rolo turtles for one brother-in-law. I helped the kiddos make ice candles for their grandmas.
This year, in addition to the toy barn and the oven mitts, I plan on making more rolo turtles (my BIL ate them all in about 5 minutes last year!) my peanut brittle that I make every year, a painted sign for my nephew Griffin, a little kitty with some accessories for Cate, a tag like this for my husband (it will be from Ethan) and some pj bottoms for Alex. I am also helping Alex make some chicken ornaments for her brothers to represent their real gift.
**If you need any ideas for Christmas crafting with little ones, head over to the Crafty Crow. Such cool ideas!!

Wednesday, December 3, 2008

Christmas Present makin'

I asked my sister in law what my nephew Jack (who is three) would like for Christmas. He is known to be a tractor freak, but Maura said he had enough tractors. "Maybe a barn," she suggested. So the hunt began for a reasonably priced nice toy barn for Jack. I found a few nice (but pricey) wooden ones, and nearly ordered one, until I saw the shipping price was $18!! So I decided I could try to make him one.
I saw this tutorial and thought that it was just adorable, but didn't know if I'd have the time or the patience to make it. So I took the pattern but tweaked it.

Instead of using fabric, batting and something rigid inside, I made the whole thing out of stiff felt. I just cut out the pieces and sewed them together using a zig-zag stitch. The little fence is from the flower decor section of Joann's. I sewed it to the side of the barn with red thread with tiny stitches around the wire that is holding the slats together.


The hay bale on the inside is also a floral item. Its and actual real small straw bale, and to make it so that it doesn't shed it's straw all over I covered it with Mod-Podge.

I'm adding a tube of animals (I took them out of the tube for the pictures) to complete the set. I figured Jack could play with the little barn with his tractors too. Hope he likes it!

Monday, November 17, 2008

Turkeys!

The 1st graders in my children's school do a project called "Gorgeous Gobblers" every November. They bring home an outline of a turkey on white card stock with instructions to decorate him in any many and with any medium they choose. And the family can help! This is the turkey Hudson (and I) made back when he was in 1st grade. Every November since his creation he hangs on a wall or a door to help us usher in Thanksgiving Day.

And this is the one Ethan made last night. I just provided the materials and cut out a few felt feathers and get did the rest. I love it! It has to go back to school to be hung in the hall with all the other Gorgeous Gobblers, but he'll be part of our permanent Thanksgiving collection soon as well.
I feel a little guilty because I didn't save the one Alex made, and it would be so cool to have all three displayed together... but Alex used cereal to decorate hers, so it deteriorated. Too bad. I wish I had had the for thought to at least photograph it.

Wednesday, November 12, 2008

Some crafting (warning: bad photos ahead)

My Kansas friend Deborah, mama of three, saw over on my family blog the tooth fairy pillow I made for Ethan last Christmas. (I made one or Hudson too.) She said how cute it was and that her son Aidan would be starting to lose some teeth soon... and that's about all I needed to make her kiddos their very own pillows. I know it will be a while before little Ella can use hers, but it was fun to make. I snapped some quick photos before I mailed them off. The pictures are terrible, sorry.
For her boys I added little sculpy initial charms so that they could tell them apart. Of course when Ethan saw the charms he wanted his own.

I am starting to do a little Christmas crafting, and because I am nearly positive that no one who I plan on giving a gift to reads this blog (or for that matter, anyone at all reads this blog, except maybe Amber...hi Amber!) I am going to talk a little bit about what I have been doing. I found a great tutorial for oven mitts over at Skip to My Lou. And because I figure that everyone can use a new oven mitt, I plan on making them for all my sisters, my SIL, MIL, my mom and a few friends. That's like 10 mitts. My first one, on the far left in the photo below, looked great, but I'm glad I decided to try it out before I made more... it wasn't heat resistant enough. So I went back to Joann's and got some thin batting to sandwich between the lining material and the insul-bright. Works much better! But because there is added thickness now I needed to use a thicker binding. On the one in the middle I tried some brown knit I had left over from Halloween costume making. It worked OK. It feels really soft, so I guess that makes up for the less than great sewing. The red one is my favorite so far. The material is vintage that I found at the thrift store. I have used it before in a bag I made for a friend's daughter. One of my sisters has red accents in her kitchen and I just think it will look great in there.


This one is a work in progress. One of my sisters has chickens. In fact, she gave us our first two chickens. I need a little bit of black or red for the binding to finish it up. That would make 3 that I can give away... only 7 to go!

Oh, and I made one other change to Skip tp My Lou's tutorial (besides adding the batting).. I use Amy Karol's "sew then cut" rule. It is seroiusly the best tip I have gleaned from her incredible book. (If you don't know what this is, I'll explain: instead of cutting out the mitt shapes and then sewing them together, I place the two quilted rectangles right side facing together, trace the mitt pattern onto it, sew on the pattern line and then cut it out all at once.)

Tuesday, October 21, 2008

Candy Corn Bean Bags **UPDATED

I am in charge of coming up with a few games for our Trunk-or-Treat. The event is only an hour long so I'm not getting too crazy with my ideas.... just keeping it simple. One game I think would be fun for he kiddos and easy to put together is a bean bag toss. I wanted to make some Halloween themed bean bags, but I was just too tired to go to the fabric store yesterday for cute Halloween fabric, so I went through my stash and came up with this idea.... Candy Corn! I had some yellow flannel, orange fleece and some black and some white cotton something-or-other (I am so limited in my knowledge of what material is called). I started by sewing together strips of the orange, yellow and white. Then I laid out the black and colored pieces right sides facing, and laid an additional white piece on top. This piece will be the lining. Then, taking a trick I learned from Bend the Rules Sewing back in my bib making days, I sewed then cut the material. SO much easier this way. Then I turned the bag right side out, filled them with 1/2 cup split peas and top-stitched them shut. It is sort of hard to top stitch a bean bag when it is already filled with beans, so some of the stitching is a little wonky, but who cares? They are only bean bags!It wasn't until I was all done and got out a few real candy corns that I realized that the orange should go in the middle. Oh well. If I were to do this again I would have used a brighter/darker yellow as well, but I was just using what I had on hand. (Sorry for the lousy photos... its a grey day here today.)

Now I just need to figure out what to toss them into??? My friend offered up a plastic black cauldron. That could work. Maybe a cut-out of a trick-or-treat bag? Any suggestions???


**UPDATE: I went with a big cat. Thanks for the suggestion Amber! He's a little freaky looking, but o-well.

Ethan gave it a trial run when he got home from school. Celia (who I babysit for) confirmed it's creepiness.

Friday, October 17, 2008

Rave Reviews....

We have to give a great review to Dawn Rice and her little guy over at Artist Reborne for the Halloween game they came up with. (We found it via The Crafty Crow ...which I just love by the way! So many awesome ideas every day!) She even included pdf downloads, so it was a snap to put together.
We had most of the needed supplies here at home.. and what we didn't have, we just substituted with something we did have. For example, we used some blocks for the bases of the playing pieces. Instead of painting the die, I colored some white stickers and just stuck them on the sides of another block. The drawings are adorable. And though I intended this to be a kid project, I ended up doing most of the coloring on the board... my youngest did help out a little.
We made the game this afternoon and have already played it twice. Thumbs up all around. The boys said, "It's like a cooler version of Candy Land!" And my husband said, with a smile, "Yeah, just shorter!" (Is it just us? Or does it always seem to take 2 hours to play Candy Land???)


Monday, September 8, 2008

More Freezer Paper Stencils

We used the freezer paper stencil technique to create peace sign shirts for our children's choir to wear as they sang "Imagine". The project moved along pretty well... I cut the stencils, another mom ironed them on and we let the kids go nuts with the paints. IMO the negative images turned out better (where the peace sign is white)...but they all looked pretty darn cool. After service a man came over and asked my sister and I how we made the shirts, so I gave him a quick tutorial and a big sheet of freezer paper (it was still in my van from the night before when we all got together to paint them). Sometimes it's nice to feel like the craft boy-scout...always prepared.

Cate gave it a try too. I cut out a large butterfly for her and set her up with some paints. I did have to help a little... mostly to make sure she painted right up to the edge of the paper to make a nice clean line. I'm a little anal like that.

She was quite pleased with the results.
And remember this picture from the other day?? See the pile of zucchini?


This is what happened to it today.....

Thursday, August 7, 2008

Stamps

My family likes to letterbox... a lot. If you haven't heard of it, it is a fun, free way to explore an area in a scavenger-hunt like way. There is more information here, at Atlas Quest, a letter boxing site, and a great article here, from Family Fun magazine. (The Family Fun article is what got us really intrigued in the activity.) What's great is that we can letterbox near home, and when we travel, so we print out clues before we go on our vacation in the Adirondacks. It adds a little something to our hikes, which we enjoy to begin with, and makes them even more fun. (Who can resist a challenge??)

Alex finding a hidden letterbox.

When we started 2 years ago, we just grabbed a stamp from our pile of stamps and used it represent our family when we "stamp in" the logbooks we find.
Hudson "stamping in" the logbook.

But while browsing through the logbooks we would see some really awesome hand cut stamps, and we always said we'd give it a try.

Someone elses's cool hand-cut stamps.

So, just recently I bought a Speedball Speedy Carve kit from Michael's and decided it was time to make our own. Now, why I didn't try sooner was beyond me, because it was sooooo easy. Now, I'm not saying that these stamps are perfect, but they came out pretty good and I'm pretty pleased with them!

The very first one I cut is the "Rumtum Cat". On Atlas Quest, when you log in you have a member name, and ours is Rumtum. (Sound familiar?) Rum Tum was the name of one of our cats...our favorite cat actually. The name has stuck with us, as you can see. Anyway, I made a Rumtum cat stamp so that we now have a "signature stamp" for our family for letterboxing. (I have to admit that carving the word RumTum backward reminded me a bit of the scene in The Shining when the kid walks around croaking "Redrum, redrum..." and then writes it on the back of the door and then the mom reads it in the mirror.... MURDER. Freaky movie!! One of my favorites.)

Then, realizing how easy this is, I transferred part of a drawing that Ethan did and made a stamp of that.
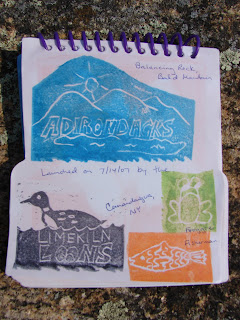
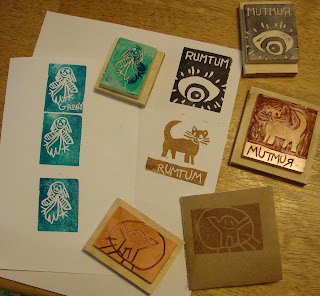
See the little guy in the top right in the drawing? Well, here he is as a stamp.

Then my husband got in on the action and made a second Rumtum stamp...this one is an eyeball... so I guess we have options when letterboxing. And then I gave my niece a piece of the Speedy Cut block and let her draw a fairy on it. Then she wrote she name and I transferred it backwards onto the stamp. (You can see the progression of her stamp in the images we stamped with it... the bottom one was first. She wasn't happy with the eyes. So we fixed them. Then we added her name.) For all the stamps I cut a piece of plywood, stamped the image onto it and then glued the carved stamp block onto the backside.

This was a relatively quick project... Gabby's took about 10 minutes total from conception to stamping with it. And it was pretty easy. I think we'll keep trying to make new ones. I really like the idea of turning one of the kids drawings into a stamp. I have my eye on an R2D2 that Hudson drew. I'll keep you posted.

Tuesday, August 5, 2008

Shadow play

I try to read to Ethan most nights at bedtime. We'll snuggle down on his bed, turn on his desk lamp and read. Many nights his brother will join us, and sometimes his sister will too. (That's a lot of people in a twin bed!) One night while all piled into Ethan's bed we discovered that the desk lamp created a great set-up for making shadow on the wall. And since I didn't know how to do many we got a book out of the library to help us along. (I can't seem to locate teh exact book we used, but this looks similar.)
This is a dog. (My daughter took these pictures.)

A bunny. Alex, my daughter, had a hard time figuring this one out..but see his big ear and half of his other ear? And his 2 front legs and one hind leg? And take a look at how twisted my hands had to be to make that bunny. Definitely a hard one for the kids to do.

Here's a cow.And a cow sticking his tongue out!

Hudson made a swan....

And Ethan made a turtle.


And then just for fun I tried to get silhouettes of each kid. (That's Alexandra, Hudson and Ethan top to bottom. Hudson looks a little stretched out.) I remember having my teacher do these to us in kindergarten. We would sit with a bright light shining on us and she drew our outline with white chalk onto black paper, then cut it out, mounted it on light paper (usually light blue) framed it and we gave them to our Moms for Mother's day. It must have been all the rage for a few years because I remember seeing framed silhouettes of all my friends and cousins hanging up in their house when I was a child.